
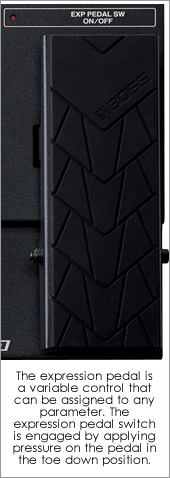
Assigns are a powerful feature of the GT-8. They provide you with a significant advantage over a traditional pedalboard. Assigns allow you to control any parameter from any effect contained within the GT-8, using the expression pedal, expression pedal switch, and the CTL pedal. The expression pedal lives up to its name – it can be used as a variable control for any parameter in real-time (for example, the rate parameter on a Uni-Vibe.) You can also control multiple parameters simultaneously.
 The ASSIGN section of the GT-8 seems complicated at first, but it’s easy to use once you understand how it works. When you create a new patch, you are essentially “assigning” your new settings to one of the number pedals.
The ASSIGN section consists of 2 buttons. These are located underneath the text “ASSIGN,” and are called CTL/EXP and VARIABLE.
CTL/EXP
The volume pedal (FV – FOOT VOLUME,) is a part of the FX CHAIN by default. It’s always engaged, unless you turn it off. The “On/Off” parameter for FV is slightly misleading – it’s labeled “EXP PEDAL” in the CTL/EXP section. It’s an on/off setting for the FOOT VOLUME, not the expression pedal. The CTL/EXP button lights up only if the FOOT VOLUME is engaged, although this section also allows you to make a single basic assignment for the expression pedal switch and the CTL pedal. The other portion of the FV, the level parameter, is located in the MASTER section.
 To enable or disable the FV:
- Press CTL/EXP.
- Use the JUMP parameters (< >) to select EXP PEDAL.
- Press the CTL/EXP button again to turn the FV on or off.
- If a controller is turned off, it flashes in the display. The FV controller provides an additional on/off indication.
- Press EXIT.
Follow a similar procedure to make an on/off assignment to the expression pedal switch and CTL pedal:
- Press CTL/EXP.
- Use the JUMP parameters (< >) to select a controller.
- Adjust the assignment by rotating the value dial.
- Turn the controller on or off by pressing CTL/EXP again.
- If a controller is turned off, it flashes in the display.
- Press EXIT.
- TUNER On/Off
- MANUAL On/Off (change the number pedals into a series of stomp boxes.)
- Delay Time (TAP)
- Hold Delay Stop
- Patch Level Inc/Dec (increase or decrease the patch level by 10 or 20 units.)
- Master BPM (TAP)
- MIDI Start/Stop
- …and more
Variable
The VARIABLE button is an extension of the CTL/EXP section. The light for the VARIABLE button doesn’t do anything, it never lights up. Adjustments made in the VARIABLE section function as additional assignments that are used together with the assignments already set in the CTL/EXP section. At this point it becomes possible to create more than one assignment that does exactly the same thing. Boss recommends that you don’t do this, however, because it might teleport your GT-8 into a different dimension.
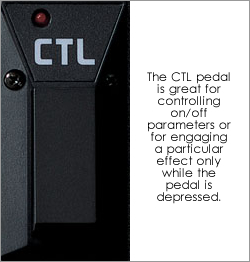
There is another difference between the CTL/EXP and VARIABLE sections. Only assignments created in CTL/EXP section affect the light indicators for the particular controller. For example, if you assign the CTL pedal to turn the DELAY on and off, the CTL pedal’s LED will light up when you engage the DELAY. This does not happen for assignments created in the VARIABLE section.
Because the volume (FV) is switched on by default in the CTL/EXP section, any additional assignments made to the expression pedal will cause the pedal to control both functions simultaneously. There is, however, a SYSTEM setting which allows you to automatically disable the volume (FV) when you engage the WAH or PEDAL BEND effect (PEDAL BEND is located in the FX-2 block.)
- Press SYSTEM.
- Use the JUMP parameters (< >) to select “EXP Pdl Func.”
The two options are AUTO and ASSIGNABLE. To automatically disable the FV, set this to AUTO. If you have an external expression pedal that you would like to use, simply set this option to ASSIGNABLE. You will then need to create the necessary assignments in the VARIABLE section.
Note: The SYSTEM section contains additional settings that allow you to set the function of all controller pedals globally. These options should be set to ASSIGNABLE to use assignments on a per-patch basis.
The solution would be to use the FX-2 block to engage the PEDAL BEND in the CTL/EXP section. You can engage the PEDAL BEND by assigning FX2 on/off to either the expression pedal switch or CTL pedal. Then set the EFFECT LEVEL to 0 and the DIRECT LEVEL to 100. This mutes the pedal bend. Additional assignments can then be created in the VARIABLE section.
The issue with this solution is that it sacrifices the significant FX-2 block.
The VARIABLE section contains 8 assignments that can be used simultaneously. These assignments include additional options that aren’t found in the CTL/EXP section.
- Press VARIABLE.
- Use the JUMP parameters (< >) to select an assignment (1 to 8.)
- When an assign is disabled, it flashes in the display.
- To enable an assign, press VARIABLE again.
- Once an assign is active, the various options can be accessed with the JUMP parameters.
- Quick settings are accessible before pressing the right JUMP parameter.
- Use the value dial to select a setting.
When an assignment is active, the following parameters are displayed:
- Target: The on/off or any other parameter of an effect.
- Min and Max: The range of the parameters that are to be targeted. You can swap these values around to reverse the operation of the controller pedal.
- Source: Sets the assign to use the CTL pedal, expression pedal or expression pedal switch.
(There are three other Source modes, namely INPUT LEVEL, INTERNAL and WAVE. These are for creating automatic effects, and will be discussed in the next post.) - Mode: The “Normal” mode sets the expression pedal to a variable control. In this case, the CTL pedal will only function while the pedal is depressed. The “Toggle” mode sets the controller to basic on/off functionality. In this case, the expression pedal will trigger each time the pedal crosses the halfway point on the way down.
- Active Range: The range that the expression pedal will operate within. This is a value between 1 (heel down) and 127 (toe down). You can assign different effects to operate within different ranges. You can also use the expression pedal to engage an effect as soon as the pedal leaves the heel down position by setting the Active Range between 0 and 1.
Examples
Example 1: Use the CTL pedal as a tap tempo for the DELAY.
In the CTL/EXP section, set the CTL PEDAL FUNCTION to Delay Time (Tap.)
Example 2: Use the expression pedal to control the volume (FV,) or the rotary speed of a Uni-Vibe when the CTL pedal is pressed.
- Set FX1 to “Uni-V.”
- Set FX2 to “Pedal Bend.”
- Set the FX2 EFFECT LEVEL to 0 and DIRECT LEVEL to 100.
(This mutes the Pedal Bend, which is only used to switch off the volume pedal.) - Both FX should be set to OFF.
- ASSIGN1
Target: fx2: on/off
Min: Off
Max: On
Source: CTL PEDAL
Mode: Toggle
Act. Range Lo: 0
Act. Range Hi: 127 - ASSIGN2
Target: fx1: on/off
Min: Off
Max: On
Source: CTL PEDAL
Mode: Toggle
Act. Range Lo: 0
Act. Range Hi: 127 - ASSIGN3
Target: FX2 uv: rate
Min: 78
Max: 29
(The Min and Max values are swapped to reverse the operation of the pedal. The expression pedal is usually left in the toe down position when it’s used as a volume control (FV.) This means that once you engage the Uni-Vibe, you can begin increasing the rate from the toe down position, instead of first bringing the pedal back to the heel down position.)
Source: EXP PEDAL
Mode: Normal
Act. Range Lo: 0
Act. Range Hi: 127
Example 3: Use the expression pedal to transition smoothly from a clean channel to a distortion channel.
- Disable the EXP PDL in the CTL/EXP section (this disables the Foot Volume.)
- Set the PREAMP Ch. Mode to D-Mono (dual mono.)
- Channel A: Clean TWIN. Level: 43.
- Channel B: SmoothDrive. Level: 75
- ASSIGN1: (assign the clean channel to the first half of the expression pedal.)
Target: ChA PRE: Mic Level
Min: 100
Max: 0
Source: EXP PEDAL
Mode: Normal
Act. Range Lo: 62
Act. Range Hi: 63 - ASSIGN2: (assign the distortion channel to the second half of the expression pedal.)
Target: ChB PRE: Mic Level
Min: 0
Max: 100
Source: EXP PEDAL
Mode: Normal
Act. Range Lo: 63
Act. Range Hi: 64 - ASSIGN3: (adjust the gain of the clean channel.)
Target: ChA PRE: Gain
Min: 21
Max: 71
Source: EXP PEDAL
Mode: Normal
Act. Range Lo: 0
Act. Range Hi: 62 - ASSIGN4: (adjust the gain of the distortion channel.)
Target: ChB PRE: Gain
Min: 7
Max: 39
Source: EXP PEDAL
Mode: Normal
Act. Range Lo: 63
Act. Range Hi: 127